


TLT(Transfer Learning Toolkit)の使い方について、チュートリアル形式で全6回にまとめました。
- TLTで推論をする方法
- 推論のコンフィグファイルの作り方
- 推論結果の確認方法
以下環境で動作確認を行いました。
TLT(Transfer Learning Toolkit)のチュートリアルに沿った内容を実践してみます。
TLTインストール後にサンプルファイルとして入っている
/notebooks/examples/detectnet_v2/detectnet_v2.ipynb
の内容となります。
今回編集するファイルは以下となります。
/workspace/
  ├ examples/
  │  ├ detectnet_v2/
  │  │  ├ detectnet_v2.ipynb # チュートリアルのソースコード
  │  │  ├ specs/  # $SPECS_DIR
  │  │  │  ├ detectnet_v2_tfrecords_kitti_trainval.txt # kitti → tfrecords に変換する設定ファイル
  │  │  │  ├ detectnet_v2_train_resnet18_kitti.txt # モデルの学習に関する設定ファイル
  │  │  │  ├ detectnet_v2_retrain_resnet18_kitti.txt # モデルの再学習に関する設定ファイル
  │  │  │  ├ detectnet_v2_inference_kitti_tlt.txt # 推論に関する設定ファイル
  ├ tlt-experiments/
  │  ├ data/  # $DATA_DOWNLOAD_DIR
  │  │  ├ training/
  │  │  │  ├ image_2/
  │  │  │  │  ├ 000000.png
  │  │  │  │  ├ 000001.png
  │  │  │  │  ├   :
  │  │  │  ├ label_2/
  │  │  │  │  ├ 000000.txt
  │  │  │  │  ├ 000001.txt
  │  │  │  │  ├   :
  │  │  ├ testing/
  │  │  │  ├ image_2/
  │  │  │  │  ├ 000000.png
  │  │  │  │  ├ 000001.png
  │  │  │  │  ├   :
│ ├ detectnet_v2/ # $USER_EXPERIMENT_DIR推論用のコンフィグファイルを作成
TLTでの推論には、コンフィグファイルが必要になります。
今回はsampleとして用意されているファイルをそのまま使います。
一応中身を確認しておきましょう。
!cat $SPECS_DIR/detectnet_v2_inference_kitti_tlt.txtコンフィグファイルの中身は、以下の内容が記載されています。
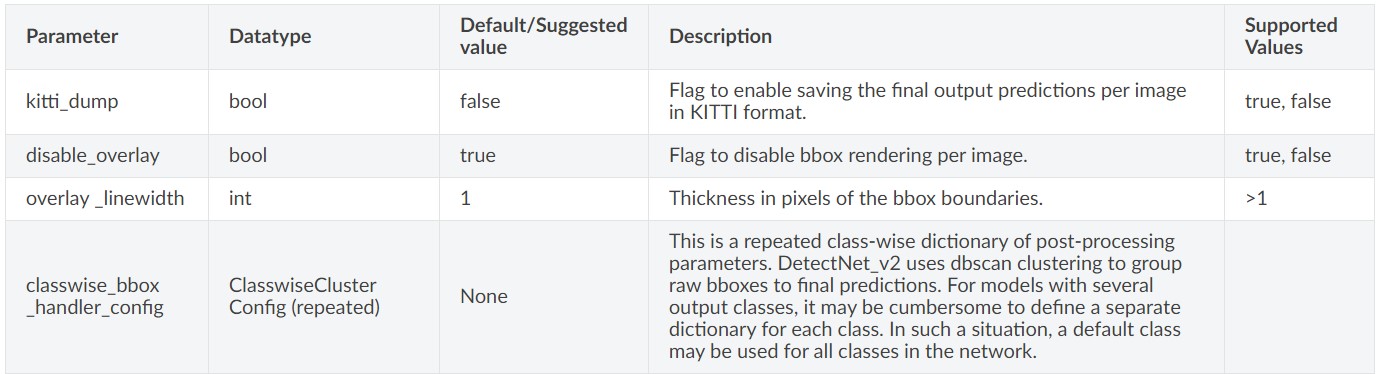
- inferencer
- Bbox Handler
inferencer
予測を整理する設定です。
推論ツールでは、TLTモデルとTensorrRTモデルの2種類がサポートされています。
今回はtltモデルでの推論する場合のコンフィグを掲載します。
inferencer_config{
  # defining target class names for the experiment.
  # Note: This must be mentioned in order of the networks classes.
  target_classes: "car"
  target_classes: "cyclist"
  target_classes: "pedestrian"
  # Inference dimensions.
  image_width: 1248
  image_height: 384
  # Must match what the model was trained for.
  image_channels: 3
  batch_size: 16
  gpu_index: 0
  # model handler config
  tlt_config{
    model: "/workspace/tlt-experiments/detectnet_v2/experiment_dir_retrain/weights/resnet18_detector_pruned.tlt"
  }
}
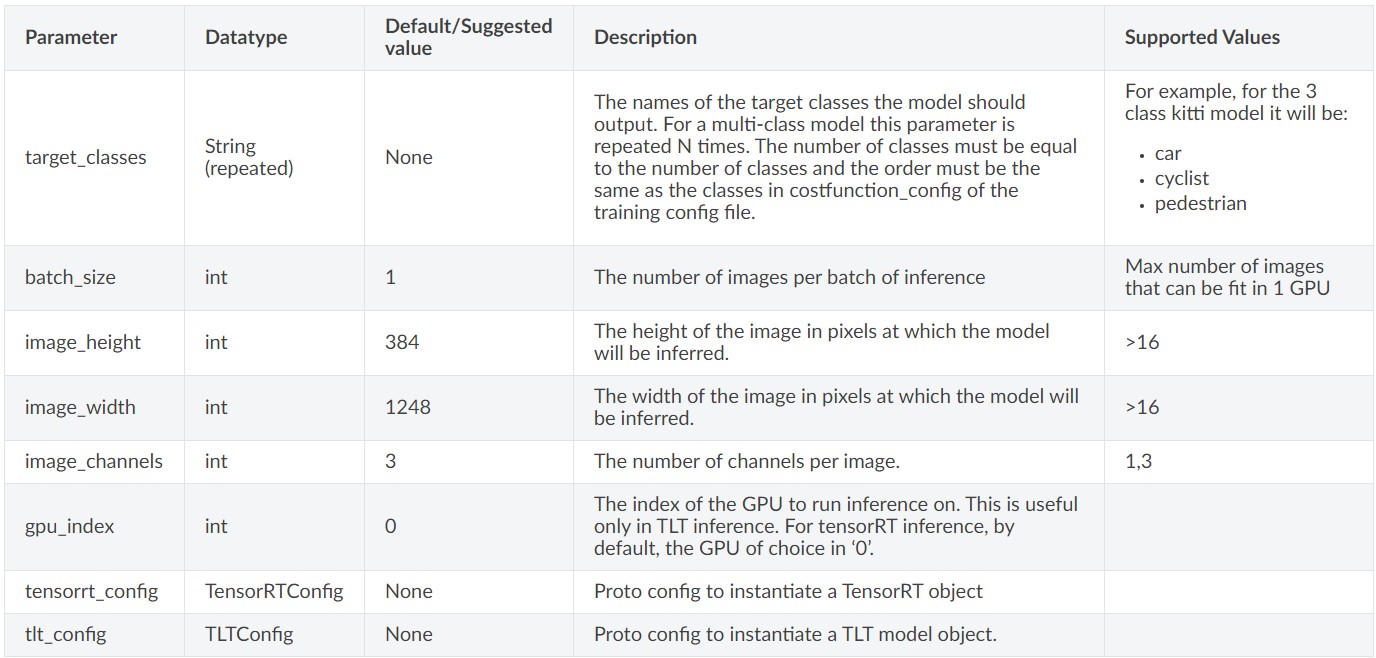
inferencerのパラメータ一覧は以下にまとめられています。
TLTモデル利用時のパラメータ
TLTモデル利用時のコンフィグのパラメータ一覧です。

tlt_configパラメータには下層に、modelパラメータが存在します。
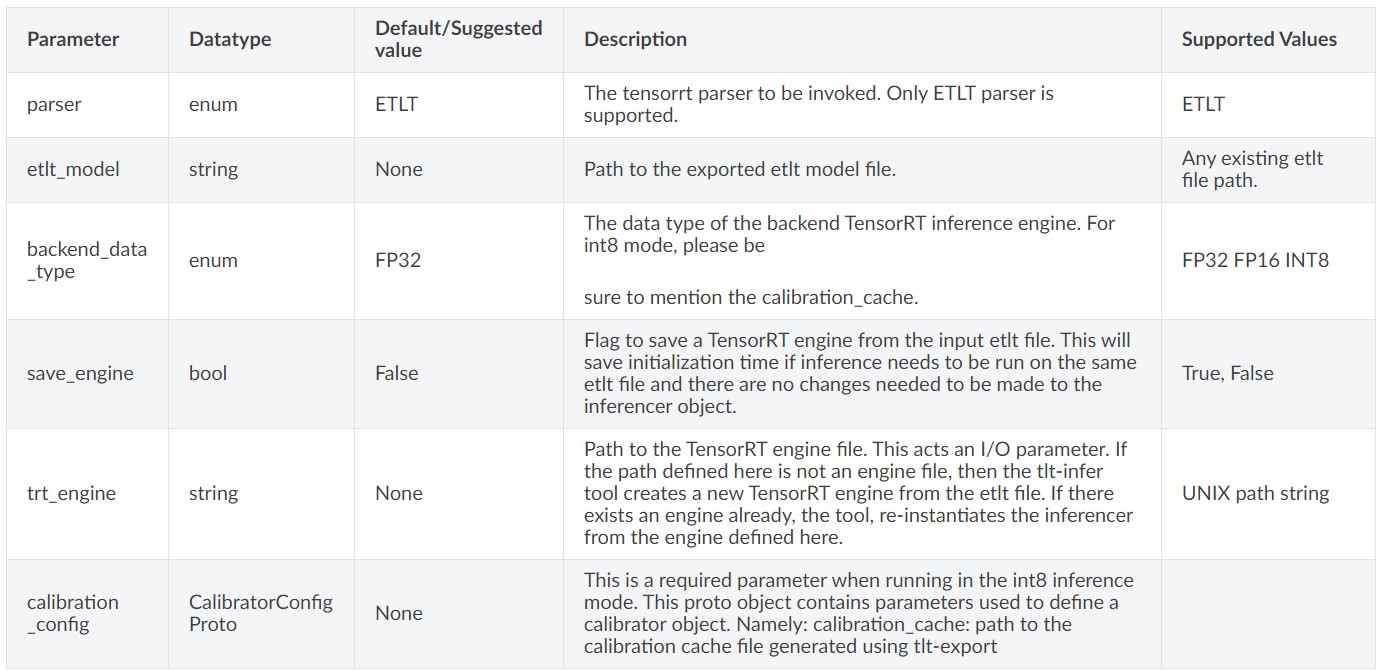
TensorRTモデル利用時のパラメータ
TensorRTモデル利用時のコンフィグのパラメータ一覧です。
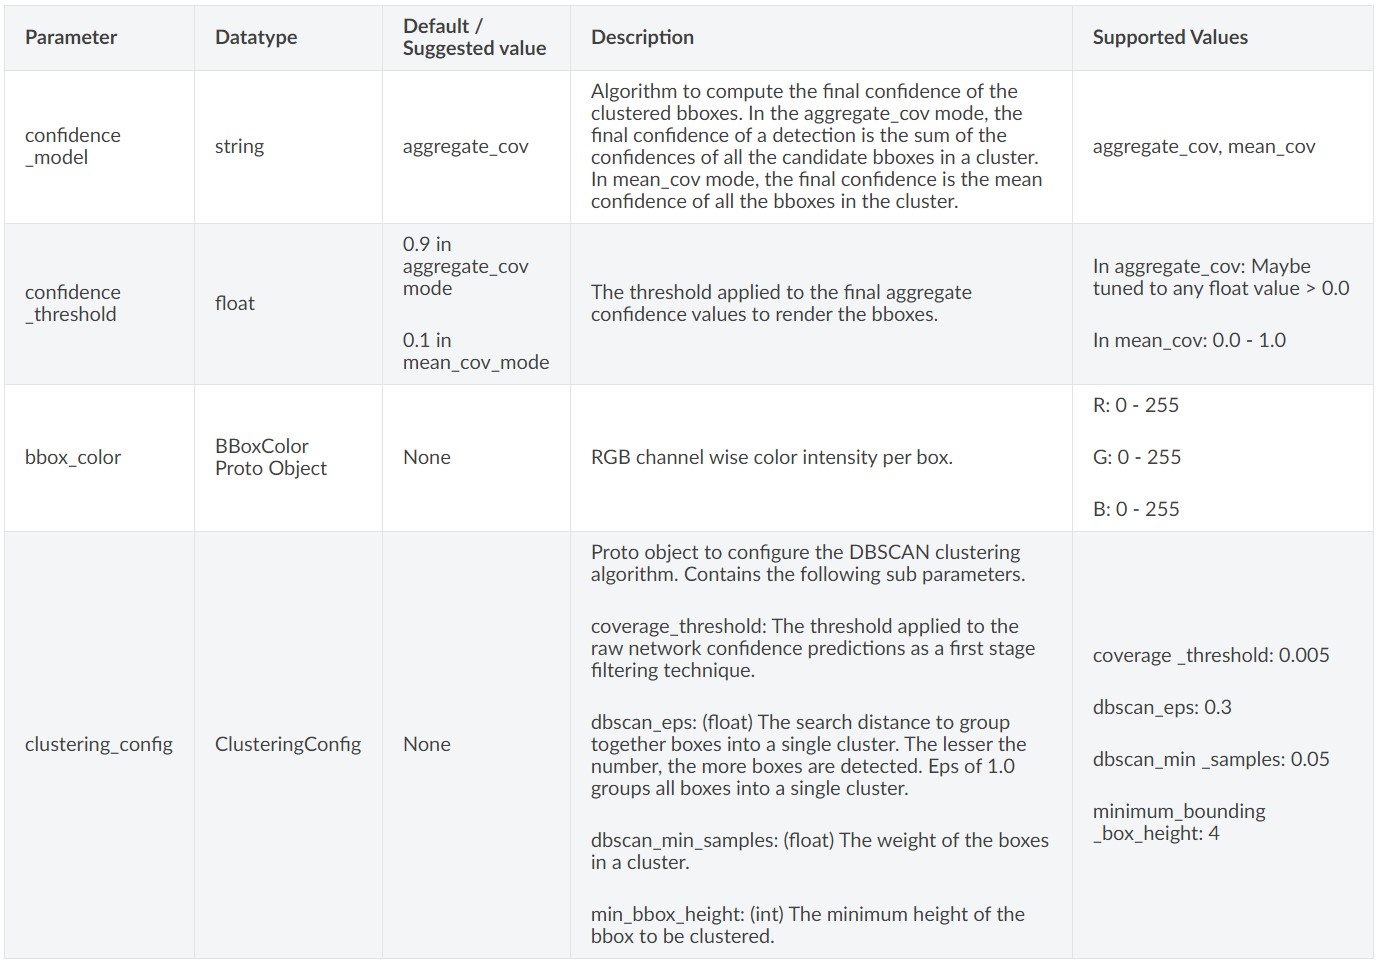
Bbox Handler
予測した結果の後処理に関する設定です。
bbox_handler_config{
  kitti_dump: true
  disable_overlay: false
  overlay_linewidth: 2
  classwise_bbox_handler_config{
    key:"car"
    value: {
      confidence_model: "aggregate_cov"
      output_map: "car"
      confidence_threshold: 0.9
      bbox_color{
        R: 0
        G: 255
        B: 0
      }
      clustering_config{
        coverage_threshold: 0.00
        dbscan_eps: 0.3
        dbscan_min_samples: 0.05
        minimum_bounding_box_height: 4
      }
    }
  }
  classwise_bbox_handler_config{
    key:"cyclist"
    value: {
      confidence_model: "aggregate_cov"
      output_map: "cyclist"
      confidence_threshold: 0.9
      bbox_color{
        R: 0
        G: 255
        B: 255
      }
      clustering_config{
        coverage_threshold: 0.00
        dbscan_eps: 0.3
        dbscan_min_samples: 0.05
        minimum_bounding_box_height: 4
      }
    }
  }
  classwise_bbox_handler_config{
    key:"pedestrian"
    value: {
      confidence_model: "aggregate_cov"
      output_map: "pedestrian"
      confidence_threshold: 0.9
      bbox_color{
        R: 255
        G: 0
        B: 0
      }
      clustering_config{
        coverage_threshold: 0.00
        dbscan_eps: 0.3
        dbscan_min_samples: 0.05
        minimum_bounding_box_height: 4
      }
    }
  }
  classwise_bbox_handler_config{
    key:"default"
    value: {
      confidence_model: "aggregate_cov"
      confidence_threshold: 0.9
      bbox_color{
        R: 255
        G: 0
        B: 0
      }
      clustering_config{
        coverage_threshold: 0.00
        dbscan_eps: 0.3
        dbscan_min_samples: 0.05
        minimum_bounding_box_height: 4
      }
    }
  }
}
Bbox Handlerのパラメータ一覧は以下にまとめられています。
Bbox Handlerの基本的なパラメータです。
classwise_bbox_handler_configで設定するクラスタリングアルゴリズムに関するパラメータです。
推論の実行
学習済みモデルを使い、任意の画像の推定を行っていきます。
前回までに作成したDetectNet_v2モデルで推論を行っていきましょう。
TLTの推論はtlt-inferコマンドを使用します。
tlt-inferコマンドの引数
tlt-inferコマンドの詳細については、公式サイトのドキュメントに詳しく記載されています。
- -e : 推論用コンフィグファイルのパス
- -o : 出力先のディレクトリのパス
- -i : 入力画像のディレクトリのパス
- -k : NGCAPIキー
推論を実行
tlt-inferコマンドを使って推論を行います。
!tlt-infer detectnet_v2 -e $SPECS_DIR/detectnet_v2_inference_kitti_tlt.txt \
                        -o $USER_EXPERIMENT_DIR/tlt_infer_testing \
                        -i $DATA_DOWNLOAD_DIR/testing/image_2 \
                        -k $KEY
推論が完了したことが表示されました。
[INFO] iva.detectnet_v2.scripts.inference: Inference complete
出力先のディレクトリを確認してみましょう。
!ls -rlt $USER_EXPERIMENT_DIR/tlt_infer_testing
tlt-inferツールの出力では、2つのディレクトリを生成します。
drwxr-xr-x 2 root root 245760 Feb 13 15:59 images_annotated
drwxr-xr-x 2 root root 245760 Feb 13 15:59 labels
- images_annotated : 検出枠がついた画像が保存されている
- labels : kitti形式で検出の情報が保存されている
推論結果の確認
推論した結果の画像をプログラム上で確認してみましょう。
まずは指定した画像を表示する関数を作成します。
# Simple grid visualizer
%matplotlib inline
import matplotlib.pyplot as plt
import os
from math import ceil
valid_image_ext = ['.jpg', '.png', '.jpeg', '.ppm']

def visualize_images(image_dir, num_cols=4, num_images=10):
    output_path = os.path.join(os.environ['USER_EXPERIMENT_DIR'], image_dir)
    num_rows = int(ceil(float(num_images) / float(num_cols)))
    f, axarr = plt.subplots(num_rows, num_cols, figsize=[80,40])
    f.tight_layout()
    a = [os.path.join(output_path, image) for image in os.listdir(output_path)
         if os.path.splitext(image)[1].lower() in valid_image_ext]
    for idx, img_path in enumerate(a[:num_images]):
        col_id = idx % num_cols
        row_id = idx // num_cols
        img = plt.imread(img_path)
        axarr[row_id, col_id].imshow(img)
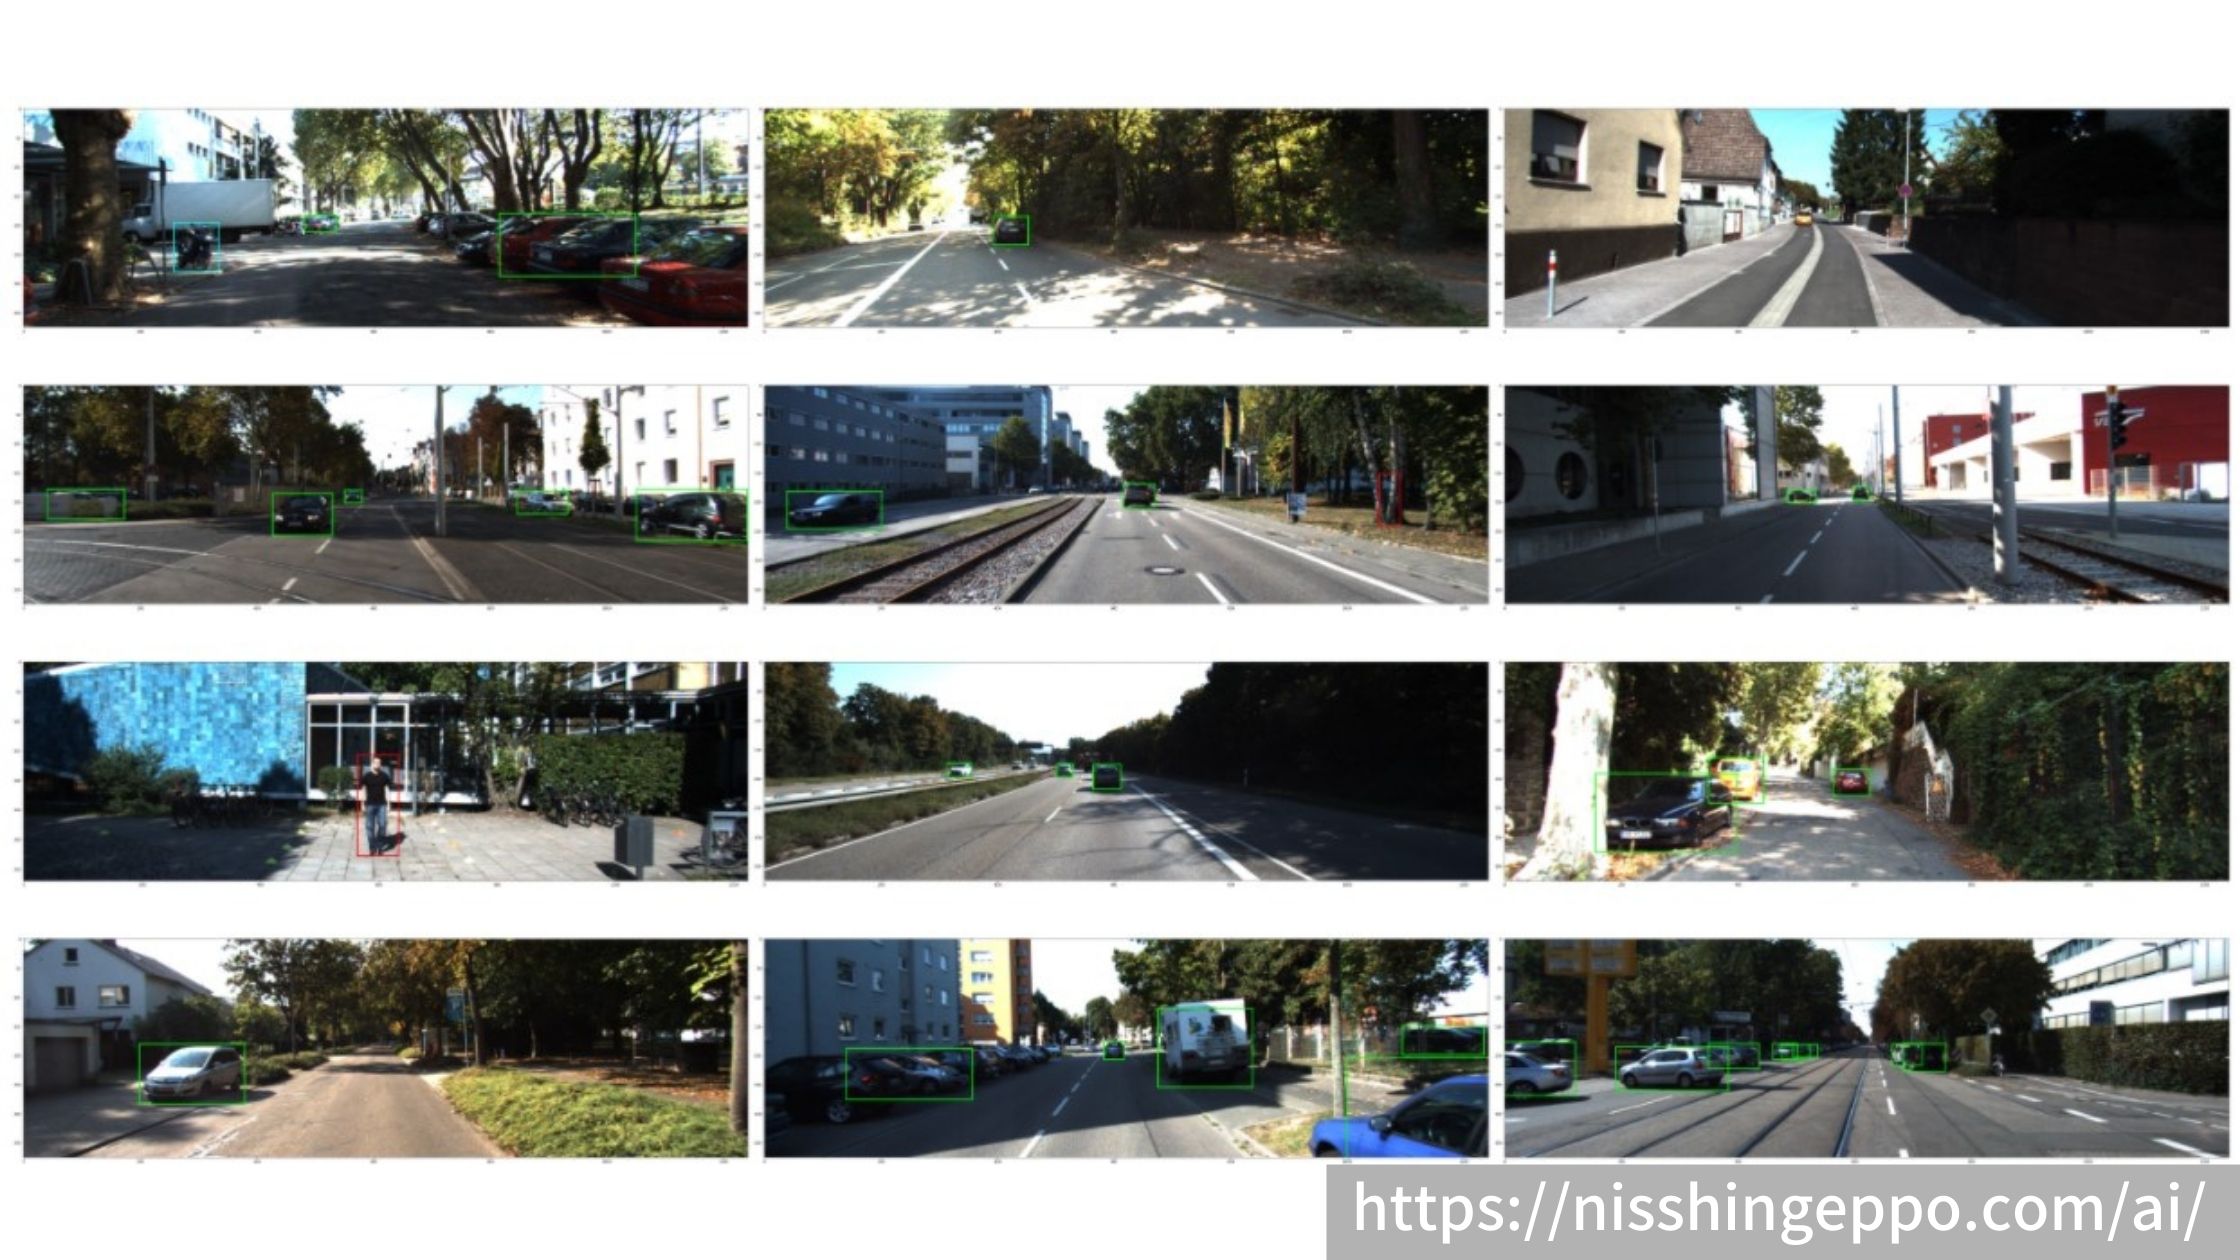
検出結果を12枚表示してみます。
OUTPUT_PATH = 'tlt_infer_testing/images_annotated' # relative path from $USER_EXPERIMENT_DIR.
COLS = 3 # number of columns in the visualizer grid.
IMAGES = 12 # number of images to visualize.

visualize_images(OUTPUT_PATH, num_cols=COLS, num_images=IMAGES)
まとめ
TLTで任意の画像で推論する方法について説明しました。
また、推論するには設定ファイルを作成する必要がありました。
tlt-inferコマンドには設定ファイル、出力先、入力画像、NGCAPIキーが必須の引数でした。
推論結果は画像に保存されているので、結果を並べて確認してみましょう。
前回の記事はこちら

コメント