


TLT(Transfer Learning Toolkit)の使い方について、チュートリアル形式で全6回にまとめました。
- 第1回:入力データの準備
- 第2回:事前学習モデルの入手
- 第3回:学習コンフィグの作成 ←★今ここ
- 第4回:モデルの学習/評価
- 第5回:モデルの枝刈り
- 第6回:推論
- TLTの学習コンフィグの作成方法
以下環境で動作確認を行いました。
TLT(Transfer Learning Toolkit)のチュートリアルに沿った内容を実践してみます。
TLTインストール後にサンプルファイルとして入っている
/notebooks/examples/detectnet_v2/detectnet_v2.ipynb
の内容となります。
今回編集するファイルは以下となります。
/workspace/
  ├ examples/
  │  ├ detectnet_v2/
  │  │  ├ detectnet_v2.ipynb # チュートリアルのソースコード
  │  │  ├ specs/  # $SPECS_DIR
  │  │  │  ├ detectnet_v2_tfrecords_kitti_trainval.txt # kitti → tfrecords に変換する設定ファイル
  │  │  │  ├ detectnet_v2_train_resnet18_kitti.txt # モデルの学習に関する設定ファイル
  ├ tlt-experiments/
  │  ├ data/  # $DATA_DOWNLOAD_DIR
  │  │  ├ training/
  │  │  │  ├ image_2/
  │  │  │  │  ├ 000000.png
  │  │  │  │  ├ 000001.png
  │  │  │  │  ├   :
  │  │  │  ├ label_2/
  │  │  │  │  ├ 000000.txt
  │  │  │  │  ├ 000001.txt
  │  │  │  │  ├   :
  │  │  ├ testing/
  │  │  │  ├ image_2/
  │  │  │  │  ├ 000000.png
  │  │  │  │  ├ 000001.png
  │  │  │  │  ├   :
  │  ├ detectnet_v2/ # $USER_EXPERIMENT_DIR
学習用のコンフィグファイルを作成
TLTでのモデルの学習には、コンフィグファイルが必要になります。
今回はsampleとして用意されているファイルをそのまま使います。
一応中身を確認しておきましょう。
!cat $SPECS_DIR/detectnet_v2_train_resnet18_kitti.txt
コンフィグファイルの中身は、以下の内容が記載されています。
- Model
- BBox ground truth generation
- Post processing module
- Cost function configuration
- Trainer
- Augmentation Module
- Evaluator
- Dataloader
Model
モデルに関する設定をしています。
今回は、18層のresnetモデルで、バッチノーマライゼーションありで学習を行う設定にしています。
事前学習済みモデルを設定しているので、転移学習を行います。
事前学習済みモデルを学習させるモデルの構成が異なる場合でも共通の層の重みだけを反映し、残りはランダムな重みを設定する仕様になっています。
objective_setは学習の目的を設定するパラメータですが、検出型の場合はこの記述から変えてはいけないようです。
model_config {
  pretrained_model_file: "/workspace/tlt-experiments/detectnet_v2/pretrained_resnet18/tlt_pretrained_detectnet_v2_vresnet18/resnet18.hdf5"
  num_layers: 18
  use_batch_norm: true
  objective_set {
    bbox {
      scale: 35.0
      offset: 0.5
    }
    cov {
    }
  }
  training_precision {
    backend_floatx: FLOAT32
  }
  arch: "resnet"
}
Modelのパラメータ一覧は以下のまとめられています。

BBox ground truth generation
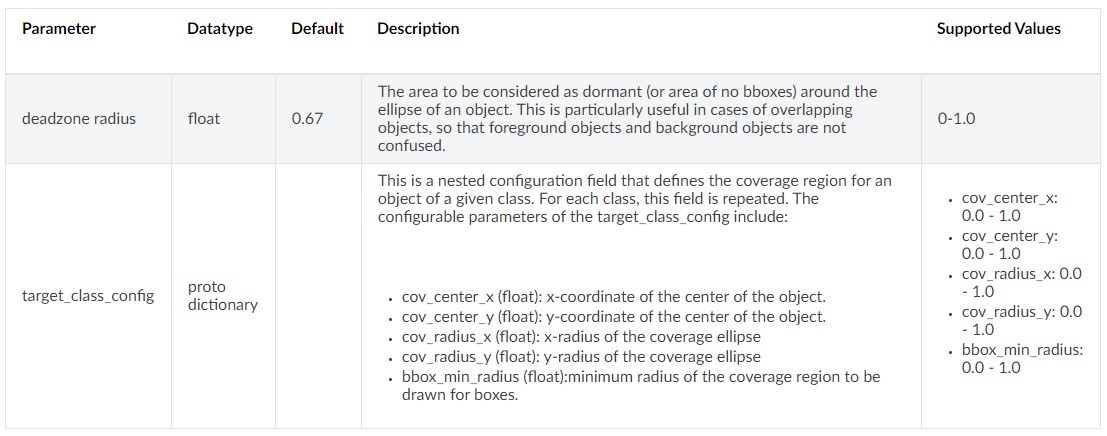
バウンディングボックスに関する設定をしています。
クラスごとにオブジェクトの中心座標やカバレッジの設定値を決めることができます。
bbox_rasterizer_config {
  target_class_config {
    key: "car"
    value {
      cov_center_x: 0.5
      cov_center_y: 0.5
      cov_radius_x: 0.40000000596
      cov_radius_y: 0.40000000596
      bbox_min_radius: 1.0
    }
  }
  target_class_config {
    key: "cyclist"
    value {
      cov_center_x: 0.5
      cov_center_y: 0.5
      cov_radius_x: 1.0
      cov_radius_y: 1.0
      bbox_min_radius: 1.0
    }
  }
  target_class_config {
    key: "pedestrian"
    value {
      cov_center_x: 0.5
      cov_center_y: 0.5
      cov_radius_x: 1.0
      cov_radius_y: 1.0
      bbox_min_radius: 1.0
    }
  }
  deadzone_radius: 0.400000154972
}
BBox ground truth generationのパラメータ一覧は以下のまとめられています。
Post processing module
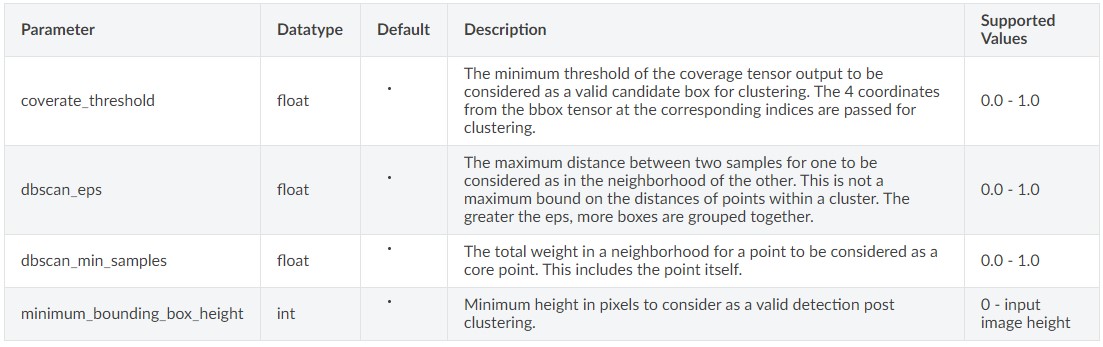
描画するバウンディングボックスに関する設定です。
確信度のしきい値の設定、近傍にある検出枠のグループ化検出枠の最小サイズを設定できます。
こちらもクラスごとにパラメータを決めます。
postprocessing_config {
  target_class_config {
    key: "car"
    value {
      clustering_config {
        coverage_threshold: 0.00499999988824
        dbscan_eps: 0.20000000298
        dbscan_min_samples: 0.0500000007451
        minimum_bounding_box_height: 20
      }
    }
  }
  target_class_config {
    key: "cyclist"
    value {
      clustering_config {
        coverage_threshold: 0.00499999988824
        dbscan_eps: 0.15000000596
        dbscan_min_samples: 0.0500000007451
        minimum_bounding_box_height: 20
      }
    }
  }
  target_class_config {
    key: "pedestrian"
    value {
      clustering_config {
        coverage_threshold: 0.00749999983236
        dbscan_eps: 0.230000004172
        dbscan_min_samples: 0.0500000007451
        minimum_bounding_box_height: 20
      }
    }
  }
}
Post processing moduleに関するパラメータ一覧は以下のまとめられています。

Cost function configuration
コスト関数に関する設定です。
このクラスで学習する場合は、値を変更しないことをnvidiaは推奨しています。
cost_function_config {
  target_classes {
    name: "car"
    class_weight: 1.0
    coverage_foreground_weight: 0.0500000007451
    objectives {
      name: "cov"
      initial_weight: 1.0
      weight_target: 1.0
    }
    objectives {
      name: "bbox"
      initial_weight: 10.0
      weight_target: 10.0
    }
  }
  target_classes {
    name: "cyclist"
    class_weight: 8.0
    coverage_foreground_weight: 0.0500000007451
    objectives {
      name: "cov"
      initial_weight: 1.0
      weight_target: 1.0
    }
    objectives {
      name: "bbox"
      initial_weight: 10.0
      weight_target: 1.0
    }
  }
  target_classes {
    name: "pedestrian"
    class_weight: 4.0
    coverage_foreground_weight: 0.0500000007451
    objectives {
      name: "cov"
      initial_weight: 1.0
      weight_target: 1.0
    }
    objectives {
      name: "bbox"
      initial_weight: 10.0
      weight_target: 10.0
    }
  }
  enable_autoweighting: true
  max_objective_weight: 0.999899983406
  min_objective_weight: 9.99999974738e-05
}
Trainer
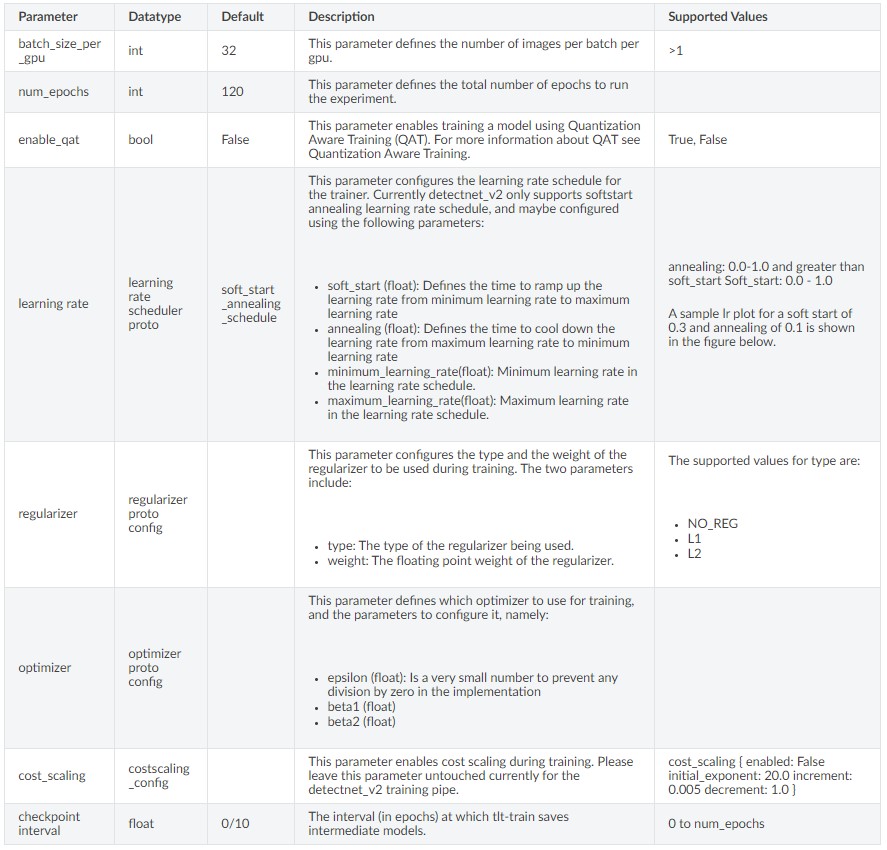
学習に関する設定です。
バッチサイズ、エポック数、学習率などのいわゆるハイパーパラメータを設定します。
training_config {
  batch_size_per_gpu: 4
  num_epochs: 5
  learning_rate {
    soft_start_annealing_schedule {
      min_learning_rate: 5e-06
      max_learning_rate: 5e-04
      soft_start: 0.10000000149
      annealing: 0.699999988079
    }
  }
  regularizer {
    type: L1
    weight: 3.00000002618e-09
  }
  optimizer {
    adam {
      epsilon: 9.99999993923e-09
      beta1: 0.899999976158
      beta2: 0.999000012875
    }
  }
  cost_scaling {
    initial_exponent: 20.0
    increment: 0.005
    decrement: 1.0
  }
  checkpoint_interval: 10
}
学習に関するパラメータ一覧は以下のまとめられています。
Augmentation Module
データの拡張に関する設定です。
Augmentation Moduleは3つの要素に分けられています。
- preprocessing : 入力テンソルの形状設定
- spatial_augmentation : 入力画像の空間的調整
- color_augmentation : 入力画像の色調整
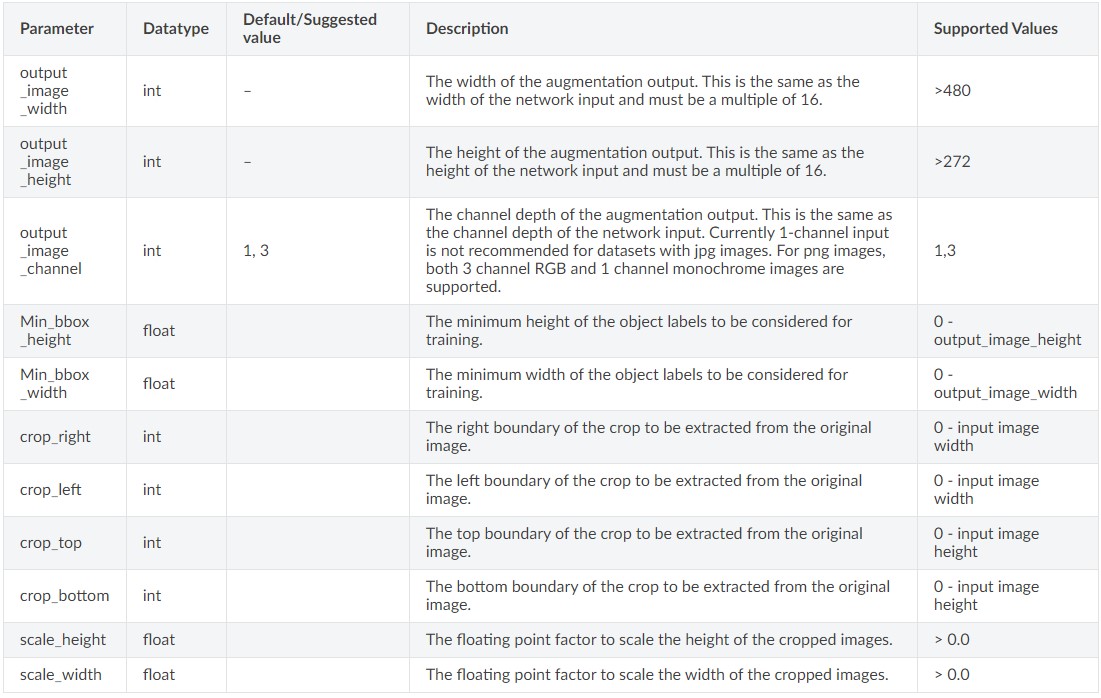
preprocessing
preprocessingでは、入力や出力画像の高さや幅などを調整しています。
augmentation_config {
  preprocessing {
    output_image_width: 1248
    output_image_height: 384
    min_bbox_width: 1.0
    min_bbox_height: 1.0
    output_image_channel: 3
  }
         :
}
preprocessingのパラメータ一覧は以下のまとめられています。
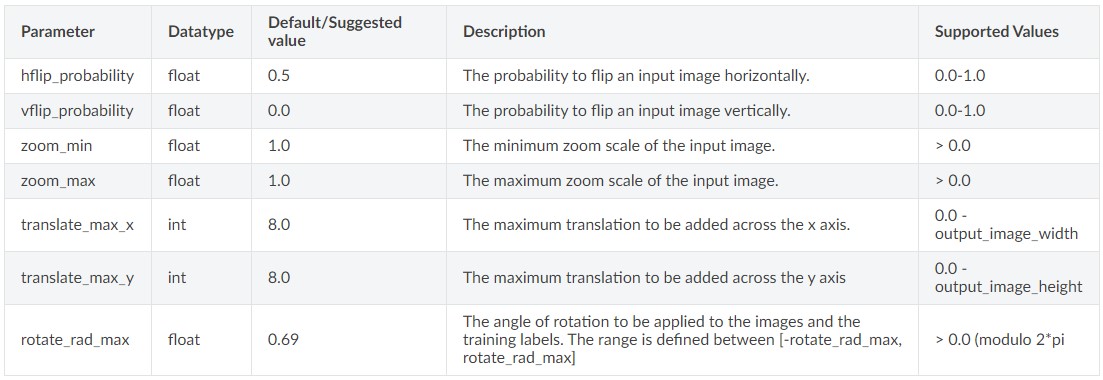
spatial_augmentation
spatial_augmentationでは、入力画像のズームや移動、回転などの空間拡張を行うことができます。
augmentation_config {
         :
  spatial_augmentation {
    hflip_probability: 0.5
    zoom_min: 1.0
    zoom_max: 1.0
    translate_max_x: 8.0
    translate_max_y: 8.0
  }
}
spatial_augmentationのパラメータ一覧は以下のまとめられています。
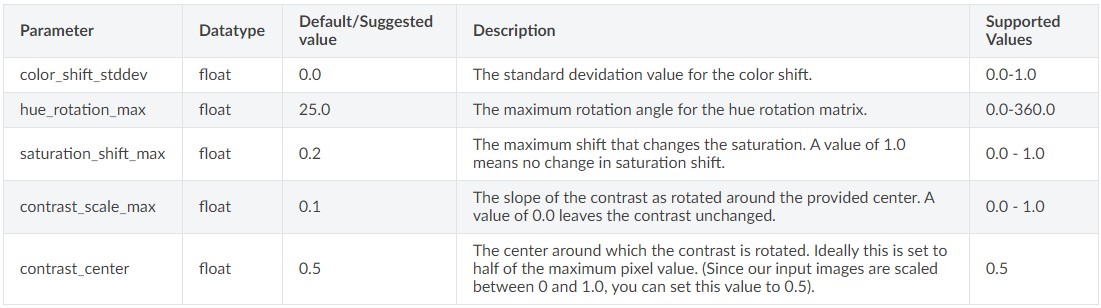
color_augmentation
color_augmentationでは、カラーシフトやコントラスト調整などの拡張を行うことができます。
augmentation_config {
         :
  color_augmentation {
    hue_rotation_max: 25.0
    saturation_shift_max: 0.20000000298
    contrast_scale_max: 0.10000000149
    contrast_center: 0.5
  }
}
color_augmentationのパラメータ一覧は以下のまとめられています。
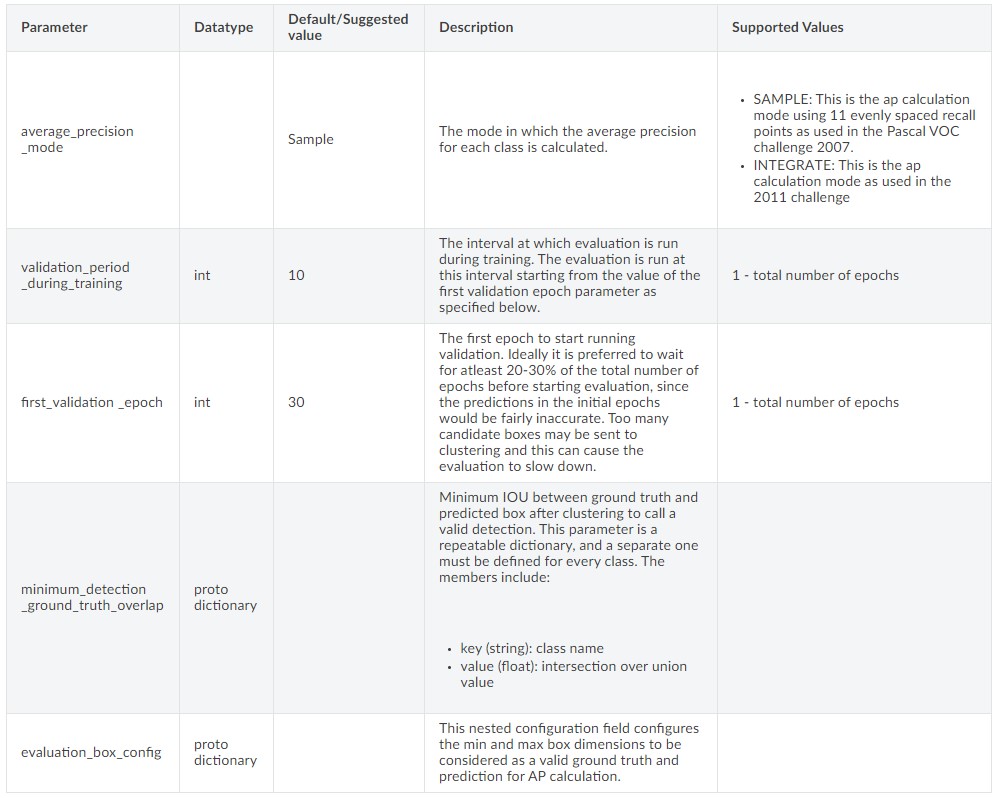
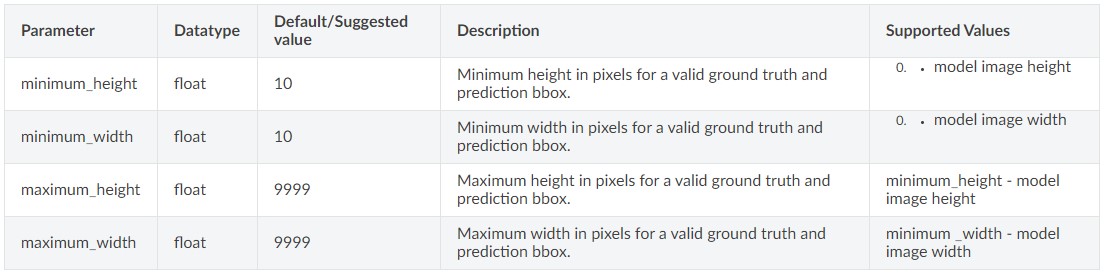
Evaluator
学習中の評価に関する設定です。
検証の期間やボックスの最小最大サイズを設定できます。
クラスごとにパラメータを決めます。
evaluation_config {
  validation_period_during_training: 10
  first_validation_epoch: 30
  minimum_detection_ground_truth_overlap {
    key: "car"
    value: 0.699999988079
  }
  minimum_detection_ground_truth_overlap {
    key: "cyclist"
    value: 0.5
  }
  minimum_detection_ground_truth_overlap {
    key: "pedestrian"
    value: 0.5
  }
  evaluation_box_config {
    key: "car"
    value {
      minimum_height: 20
      maximum_height: 9999
      minimum_width: 10
      maximum_width: 9999
    }
  }
  evaluation_box_config {
    key: "cyclist"
    value {
      minimum_height: 20
      maximum_height: 9999
      minimum_width: 10
      maximum_width: 9999
    }
  }
  evaluation_box_config {
    key: "pedestrian"
    value {
      minimum_height: 20
      maximum_height: 9999
      minimum_width: 10
      maximum_width: 9999
    }
  }
  average_precision_mode: INTEGRATE
}
評価に関するパラメータ一覧は以下のまとめられています。
Dataloader
学習用データに関する設定です。
学習用画像へのパスの指定や拡張子を設定できます。
dataset_config {
  data_sources {
    tfrecords_path: "/workspace/tlt-experiments/data/tfrecords/kitti_trainval/*"
    image_directory_path: "/workspace/tlt-experiments/data/training"
  }
  image_extension: "png"
  target_class_mapping {
    key: "car"
    value: "car"
  }
  target_class_mapping {
    key: "cyclist"
    value: "cyclist"
  }
  target_class_mapping {
    key: "pedestrian"
    value: "pedestrian"
  }
  target_class_mapping {
    key: "person_sitting"
    value: "pedestrian"
  }
  target_class_mapping {
    key: "van"
    value: "car"
  }
  validation_fold: 0
}
まとめ
TLTでの学習に使うコンフィグファイルについて説明しました。
コンフィグで設定するのは以下の8つの要素でした。
- Model
- BBox ground truth generation
- Post processing module
- Cost function configuration
- Trainer
- Augmentation Module
- Evaluator
- Dataloader
次回は今回作ったコンフィグを使って、事前学習モデルを元に転移学習をしていきます。
次回の記事はこちら
前回の記事はこちら
コメント