


この記事を読んで分かること
- Grad-CAMの実装方法
ディープラーニングで良い精度が出ないときに、AIの判断根拠を知りたくなることがしばしばあります。
今回は、Grad-CAMを使ってCNNを使った画像認識AIの注目領域を可視化していきます。
事前準備
必要なライブラリのインポート
まずは必要なライブラリを読み込みます。
import math
import re
import os
import numpy as np
import tensorflow as tf
from tensorflow.python.client import device_lib
from keras import backend as K
import cv2
import matplotlib.pyplot as plt

print("Tensorflow version " + tf.__version__)GPUの読み込み
GPUがある場合は認識して使えるようにします。
if tf.test.is_gpu_available():
    gpus = tf.config.experimental.list_physical_devices('GPU')

    for gpu in gpus:
        tf.config.experimental.set_memory_growth(gpu, True)

    print("GPUの読み込みが完了しました")

else:
    print("GPUが存在していません")
    device_lib.list_local_devices()
モデルの準備
推論に使用するモデルを準備します。
今回はimagenetで学習済みのVGG16モデルを使用します。
model = tf.keras.applications.vgg16.VGG16(weights="imagenet", include_top=True)  # VGG16
# model = tf.keras.applications.mobilenet_v2.MobileNetV2(weights="imagenet", include_top=True)  # MobileNetV2
# model = tf.keras.applications.resnet50.ResNet50(weights="imagenet", include_top=True) #ResNet50
# model = tf.keras.applications.efficientnet_v2.EfficientNetV2B1(weights="imagenet", include_top=True) # efficientnet_v2

model.summary()
AIが画像のどこに着目しているか確認するために、畳み込み層(Conv2D)のうち一番出力に近いものの名前を覚えておきましょう。
今回の場合は「block5_conv3」となります。
入力画像の準備
モデルに合わせて入力画像の準備をしておきます。
VGG16は入力画像サイズが224×224なのでリサイズして、ついでに画像の中身も確認しておきます。
IMAGE_PATH = "./data/cat.jpg"
input_hight = 224
input_width = 224
last_conv_layer_name = "block5_conv3"

resize_image = tf.keras.preprocessing.image.load_img(IMAGE_PATH, target_size=(input_hight, input_width))

plt.figure(figsize=(4, 4))
plt.imshow(resize_image)
plt.show()

# 画像をモデルに合わせた形式に変換
reshape_image = tf.keras.preprocessing.image.img_to_array(resize_image).reshape(1, input_hight, input_width, 3)
target_image = tf.keras.applications.vgg16.preprocess_input(reshape_image) # vgg16
# target_image = tf.keras.applications.mobilenet_v2.preprocess_input(reshape_image)  # mobilenet_v2
# target_image = tf.keras.applications.resnet50.preprocess_input(reshape_image)  # resnet50
# target_image = tf.keras.applications.efficientnet_v2.preprocess_input(reshape_image) # efficientnet_v2
今回は、こちらの猫ちゃんの画像をインプットとします。

AIで推論
VGG16モデルの推論結果を確認します。
predict_result = model.predict(target_image)
print(tf.keras.applications.vgg16.decode_predictions(predict_result, top=3))
88%以上の確率で猫であるという結果が得られました。
Grad-CAMの実装
いよいよAIが画像のどこを見て猫だと判断しているかを確認していきます。
AIが着目している部分を抽出
AIが着目している部分を抽出して、ヒートマップに変換する処理していきます。
def make_heatmap(last_conv_layer_name, model, target_image):
with tf.GradientTape() as tape:
last_conv_layer = model.get_layer(last_conv_layer_name) # 最後の畳込み層を取り出す
iterate = tf.keras.models.Model([model.inputs], [model.output, last_conv_layer.output])
model_out, last_conv_layer = iterate(target_image)
class_out = model_out[:, np.argmax(model_out[0])]
grads = tape.gradient(class_out, last_conv_layer)
pooled_grads = K.mean(grads, axis=(0, 1, 2))
heatmap = tf.reduce_mean(tf.multiply(pooled_grads, last_conv_layer), axis=-1)
heatmap_shape = (grads.shape[1], grads.shape[2])
# ヒートマップの値を正規化
heatmap_Emphasis = np.maximum(heatmap, 0)
heatmap_Emphasis /= np.max(heatmap_Emphasis)
heatmap_Emphasis = heatmap_Emphasis.reshape(heatmap_shape)
plt.matshow(heatmap_Emphasis)
plt.show()
return heatmap_Emphasis
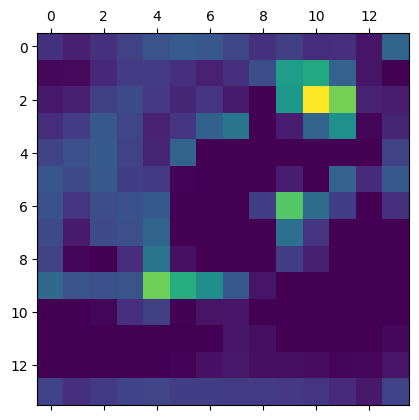
heatmap = make_heatmap(last_conv_layer_name, model, target_image)
畳み込み層のどの部分に着目しているかを抽出することができました。
元画像にヒートマップを合成
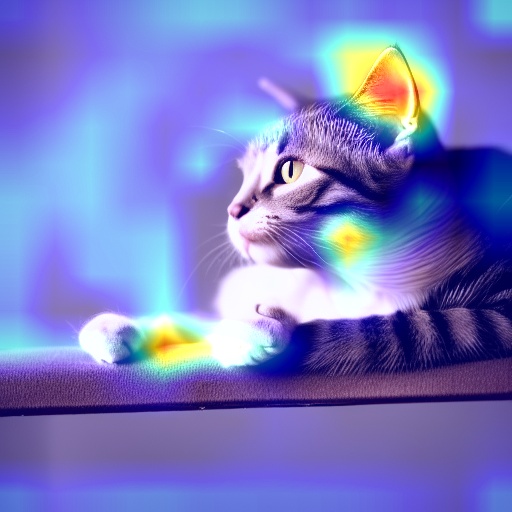
元画像にヒートマップを合成して可視化します。
def compose_heatmap(image_path, heatmap):
    img = cv2.imread(image_path)
    INTENSITY = 0.6

    heatmap = cv2.resize(heatmap, (img.shape[1], img.shape[0]))
    heatmap = cv2.applyColorMap(np.uint8(255*heatmap), cv2.COLORMAP_JET)

    img = heatmap * INTENSITY + img

    cv2.imwrite('heatmap.jpg', img)
AIは猫の耳とほっぺたと手の部分に着目していることが可視化できました。
まとめ
Grad-CAMを使ってAIが画像のどの部分に着目しているのかを可視化することができました。
中間層の情報を抽出することで、AIにとって重要なパラメータを判断できるのでチューニングの参考情報として役立てることができます。
参考文献

Grad-CAM: Visual Explanations from Deep Networks via Gradient-based Localization
We propose a technique for producing "visual explanations" for decisions from a large class of CNN-based models, making them more transparent. Our approach - Gr...
arxiv.org
[Tensorflow2系]Grad-CAMについて0から勉強をやり直す - Qiita
目的Grad-CAMの処理内容を理解するTensorflow 2系の書き方を把握する使用する文献Visualizing Activation Heatmaps using TensorFlo…
qiita.com
コメント